While browsing the Internet I stumbled on the video from the Tech Craft channel on how to connect a Raspberry Pi 4 to an iPad Pro. I’ve been using my iPad Pro 12”9 inches for a bit more than a year now and still trying to perform as much as possible from it, with the ultimate goal of using it as a full replacement for my laptop.
Do not get me wrong, I love the form factor, the light weight and the battery duration. Still I was struggling to perform the technical experiments I was looking for. For example I started to go through the last book from Adrian Rosebrock Raspberry Pi for computer vision. But to play with the examples you need a working Python environment with OpenCV and Numpy installed. This is not possible on the iPad. I installed Pythonista for iOS but OpenCV is not included.
I tried to follow the instructions from the various pages in reference but there has been some slight amendments required to make it work fully.
In addition I wanted to secure the Raspberry with private/public key authentication, connection through mosh instead of SSH, setting-up NTP and more globally finalizing the set-up on the Pi side before moving on.
This page puts together my notes to achieve this result. I plugged my Raspberry Pi 4 on an external screen and keyboard & mouse and set up up directly from the terminal.
Install Raspbian and set-up the Pi
First you have to install Raspbian on the Raspberry Pi and plug it in. I won’t provide the details on how to flash the SD card and perform the initial installation when booting the Pi for the first time (set up WIFI, timezone & location).
Considering that this set up has been possible thanks to a recent update to the Raspberry Pi 4 bootloader - it now not only enables the low power mode for USB hardware but also allows the enabling of Network boot and enables data over the USB-C port - I recommend setting up your Pi so that it automatically updates the boot loader: this means you will get new features and bug fixes as they are released.
Bootloader updates are performed by the rpi-eeprom packages which installs a service that runs at boot-time to check for critical updates.
sudo apt update
sudo apt full-upgrade
sudo apt install rpi-eeprom
If you wish to control then the updates are applied you can disable the systems service from running automatically and run reset-eeprom-update manually.
# Prevent the service from running, this can be run before the
# package is installed to prevent it ever running automatically.
sudo system to mask rpi-eeprom-update

# Enable it again
sudo systemctl unmask rpi-eeprom-update
Change you default password
The default username and password is used for every single Raspberry Pi running Raspbian. So, if you can get access to a Raspberry Pi, and these settings have not been changed, you have root access to that Raspberry Pi.
So the first thing to do is change the password. This can be done via the raspi-config application, or from the command line.
11am sudo raspi-config
Select option 2, and follow the instructions to change the password.
In fact, all raspi-config does is start up the command line passwd application, which you can do from the command line. Simply type in your new password and confirm it.
passwd
Change your username
You can, of course, make your Raspberry Pi even more secure by also changing your username. All Raspberry Pis come with the default username pi, so changing this will immediately make your Raspberry Pi more secure.
To add a new user, enter:
sudo adduser alice
You will be prompted to create a password for the new user.
The new user will have a home directory at /home/alice/.
To add them to the sudo group to give them sudo permissions as well as all of the other necessary permissions:
sudo usermod -a -G adm,dialout,cdrom,sudo,audio,video,plugdev,games,users,input,netdev,gpio,i2c,spi alice
You can check your permissions are in place (i.e. you can use sudo) by trying the following:
sudo su - alice
If it runs successfully, then you can be sure that the new account is in the sudo group.
Set-up Connection through USB-C with iPad
With this enabled all the same script from the Pi Zero’s should just work but here is the updated version for Raspbian Buster.
Add dtoverlay=dwc2 to the /boot/config.txt
Add modules-load=dwc2 to the end of /boot/cmdline.txt
If you have not already enabled ssh then create a empty file called ssh in /boot
Add libcomposite to /etc/modules
Add denyinterfaces usb0 to /etc/dhcpcd.conf
Install dnsmasq with sudo apt-get install dnsmasq
Create /etc/dnsmasq.d/usb with following content
interface=usb0
dhcp-range=10.55.0.2,10.55.0.6,255.255.255.248,1h
dhcp-option=3
leasefile-ro
Create /etc/network/interfaces.d/usb0 with the following content
auto usb0
allow-hotplug usb0
iface usb0 inet static
  address 10.55.0.1
  netmask 255.255.255.248
Create /root/usb.sh
#!/bin/bash
cd /sys/kernel/config/usb_gadget/
mkdir -p pi4
cd pi4
echo 0x1d6b > idVendor # Linux Foundation
echo 0x0104 > idProduct # Multifunction Composite Gadget
echo 0x0100 > bcdDevice # v1.0.0
echo 0x0200 > bcdUSB # USB2
echo 0xEF > bDeviceClass
echo 0x02 > bDeviceSubClass
echo 0x01 > bDeviceProtocol
mkdir -p strings/0x409
echo "fedcba9876543211" > strings/0x409/serialnumber
echo "Ben Hardill" > strings/0x409/manufacturer
echo "PI4 USB Device" > strings/0x409/product
mkdir -p configs/c.1/strings/0x409
echo "Config 1: ECM network" > configs/c.1/strings/0x409/configuration
echo 250 > configs/c.1/MaxPower
# Add functions here
# see gadget configurations below
# End functions
mkdir -p functions/ecm.usb0
HOST="00:dc:c8:f7:75:14" # "HostPC"
SELF="00:dd:dc:eb:6d:a1" # "BadUSB"
echo $HOST > functions/ecm.usb0/host_addr
echo $SELF > functions/ecm.usb0/dev_addr
ln -s functions/ecm.usb0 configs/c.1/
udevadm settle -t 5 || :
ls /sys/class/udc > UDC
ifup usb0
service dnsmasq restart
Make /root/usb.sh executable with chmod +x /root/usb.sh
Add sh /root/usb.sh to /etc/rc.local before exit 0 (I really should add a systemd startup script here at some point)
With this setup the Pi4 will show up as a ethernet device with an IP address of 10.55.0.1 and will assign the device you plug it into an IP address via DHCP. This means you can just ssh to pi@10.55.0.1 to start using it.
Notes:
With my first attempt I did not manage to have the iPad get its IP from the Raspberry so for the time being I set it up manually as follows:
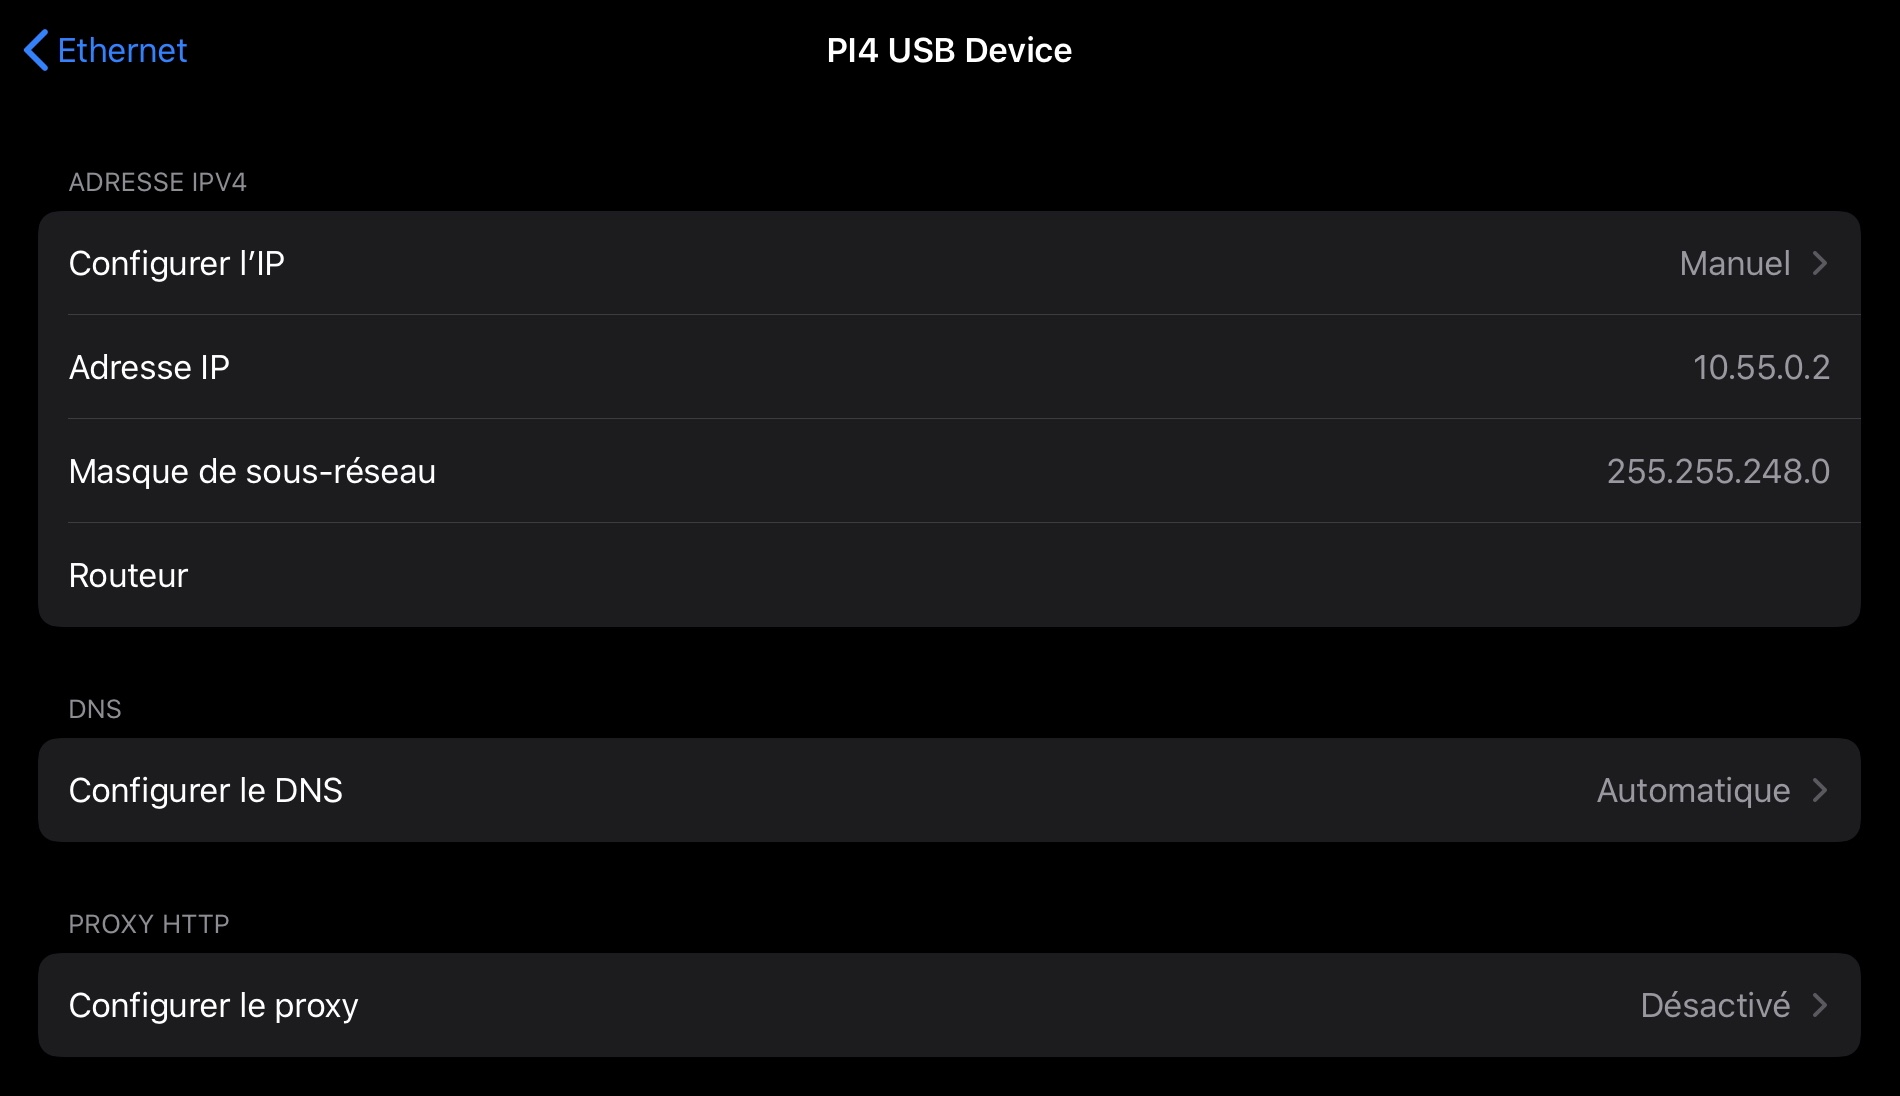
After a full reinstallation I managed to get it working so I believe there was a typo in my first attempt.
When trying to connect from Blinkt! via SSH you might encounter the following error if you previously set-up an SSH connection to the same server:
blink> ssh pipad.local
Host key for server changed.
Ed25519 key fingerprint is SHA256:gvGAa2D1yVxpJoiAI/awyk2Dq9YU12TYtSHmDxo76sE.
For security reason, connection will be stopped
To solve this problem you can remove the old key using the ssh-keygen command:
blink> ssh-keygen -R 10.55.0.1
From this point you can connect to your Raspberry Pi through Blink which is an incredible terminal emulator for iOS by simply entering the following command ssh pi@10.55.0.1.
Improving SSH security
SSH is a common way of accessing a Raspberry Pi remotely. By default, logging in with SSH requires a username/password pair, and there are ways to make this more secure. An even more secure method is to use key based authentication.
Improving username/password security
The most important thing to do is ensure you have a very robust password. If your Raspberry Pi is exposed to the internet, the password needs to be very secure. This will help to avoid dictionary attacks or the like.
You can also allow or deny specific users by altering the sshd configuration.
sudo nano /etc/ssh/sshd_config
Add, edit, or append to the end of the file the following line, which contains the usernames you wish to allow to log in:
AllowUsers alice bob
You can also use DenyUsers to specifically stop some usernames from logging in:
DenyUsers jane john
After the change you will need to restart the sshd service using sudo systemctl restart ssh or reboot so the changes take effect.
Using key-based authentication
Key pairs are two cryptographically secure keys. One is private, and one is public. They can be used to authenticate a client to an SSH server (in this case the Raspberry Pi).
The client generates two keys, which are cryptographically linked to each other. The private key should never be released, but the public key can be freely shared. The SSH server takes a copy of the public key, and, when a link is requested, uses this key to send the client a challenge message, which the client will encrypt using the private key. If the server can use the public key to decrypt this message back to the original challenge message, then the identity of the client can be confirmed.
Generating a key pair in Linux is done using the ssh-keygen command on the client; the keys are stored by default in the .ssh folder in the user’s home directory. The private key will be called id_rsa and the associated public key will be called id_rsa.pub. The key will be 4096 bits long: breaking the encryption on a key of that length would take an extremely long time, so it is very secure. You can make longer keys if the situation demands it. Note that you should only do the generation process once: if repeated, it will overwrite any previous generated keys. Anything relying on those old keys will need to be updated to the new keys.
You will be prompted for a passphrase during key generation: this is an extra level of security. For the moment, leave this blank.
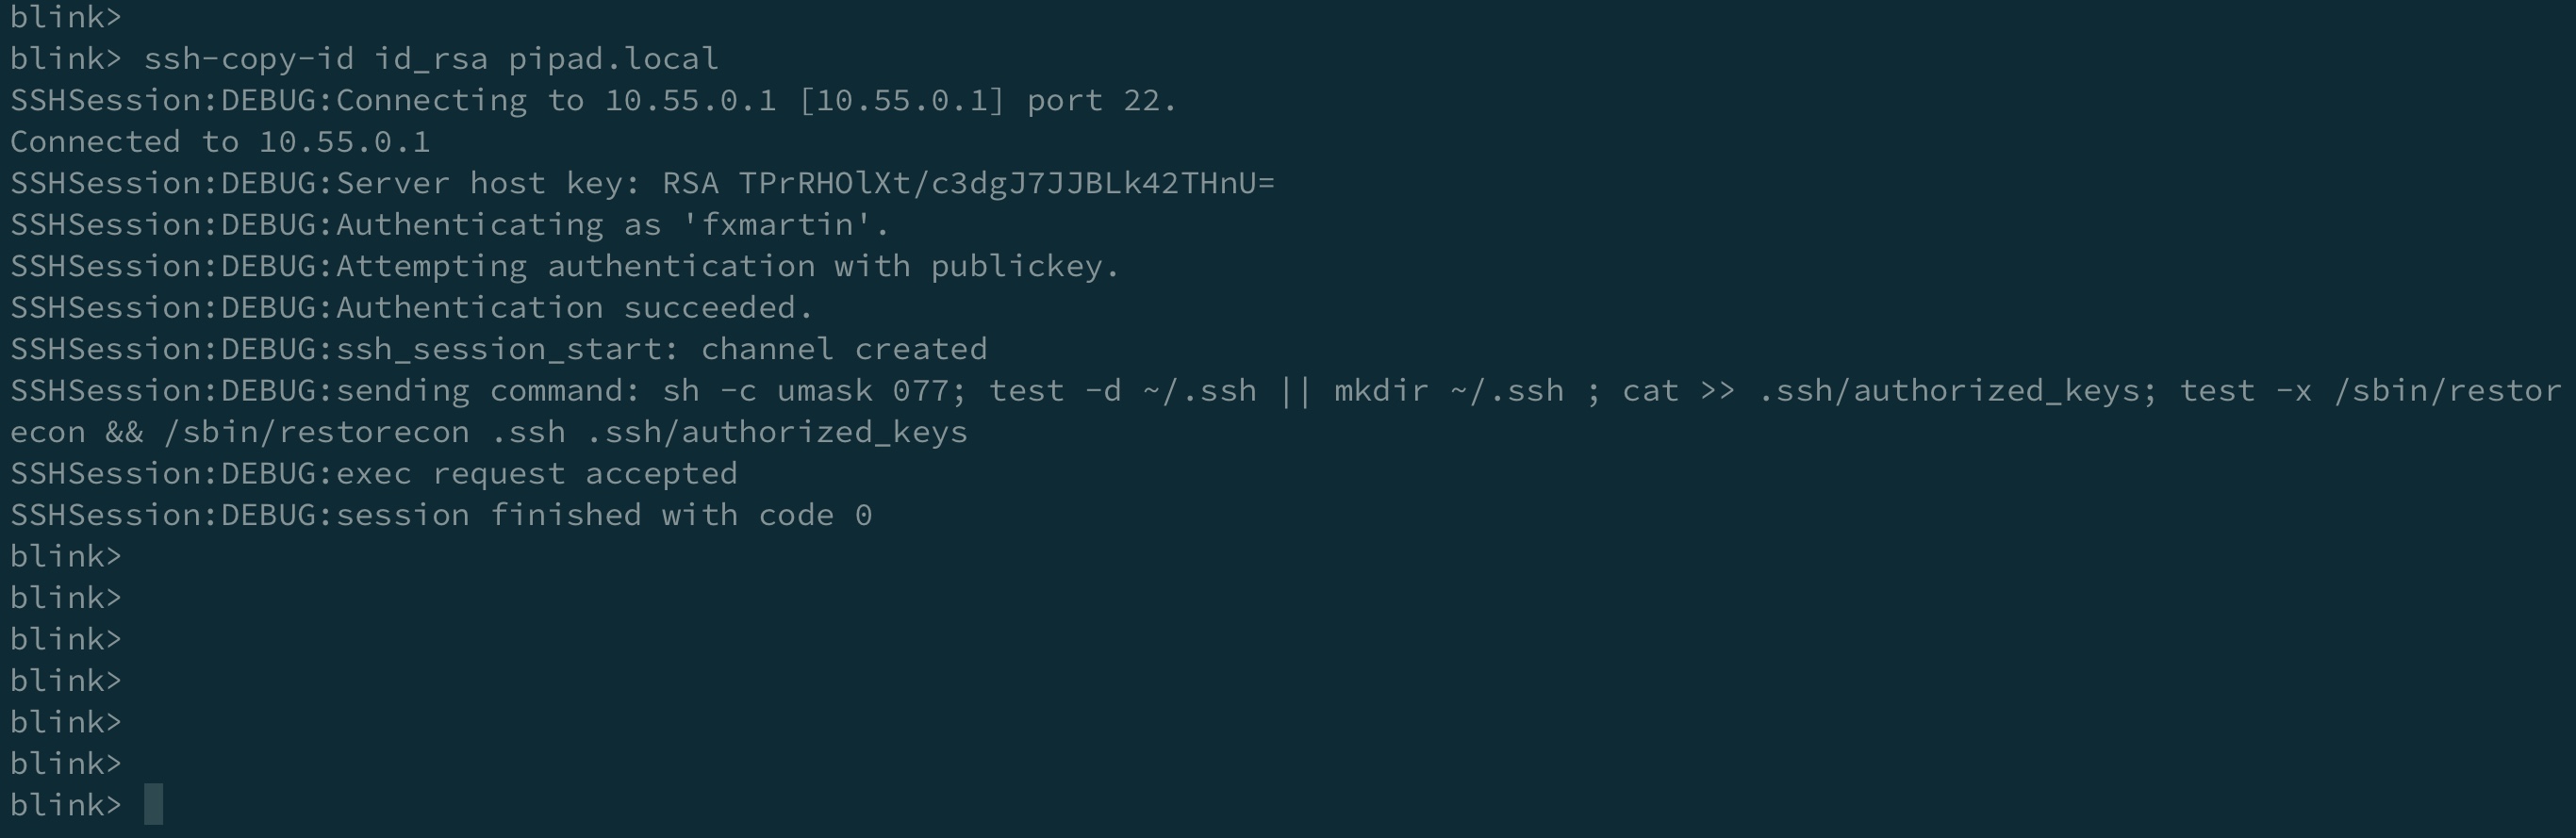
In Blink you can set-up specific hosts and create SSH keys. You do so via the config menu by simply entering configon the Blink command line.

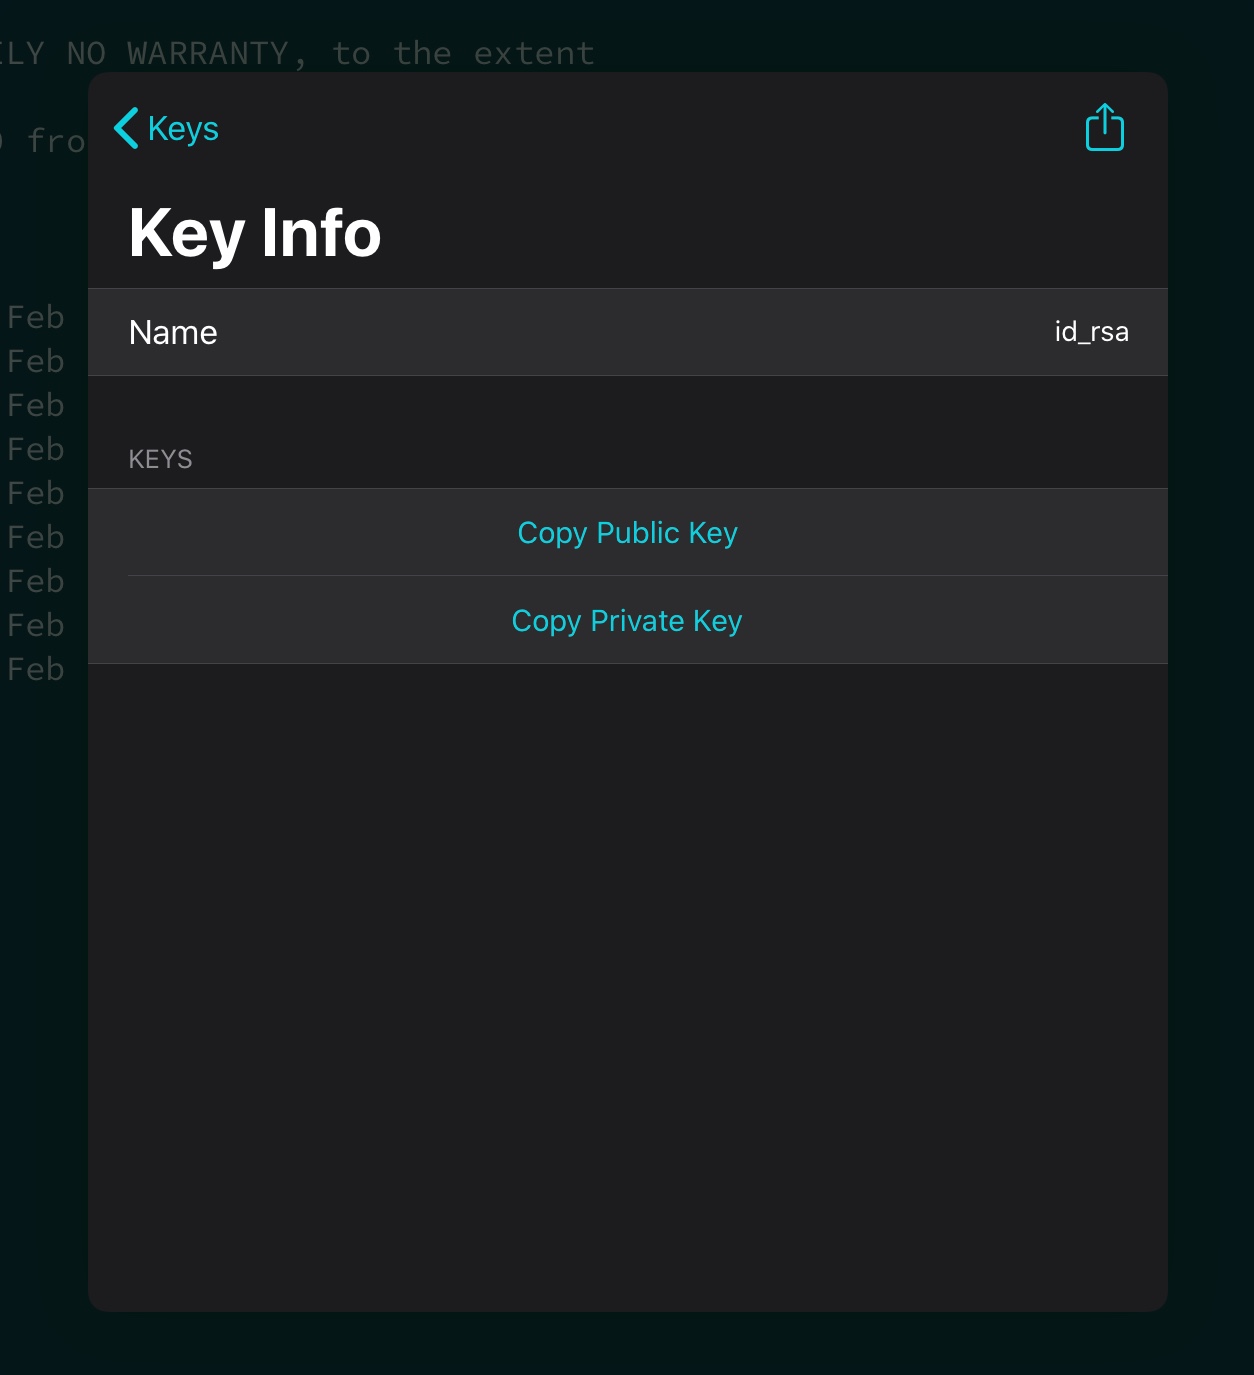
Then you copy the public key to your Pi and next time you SSH no password will be requested.
Finally, we need to disable password logins, so that all authentication is done by the key pairs.
sudo nano /etc/ssh/sshd_config
There are three lines that need to be changed to no, if they are not set that way already:
ChallengeResponseAuthentication no
PasswordAuthentication no
UsePAM no
Save the file and either restart the ssh system with sudo service ssh reload or reboot.
Change the host name
If, like me, you have more than one Raspberry Pi on your network, then it is a good idea to give each one a unique name. If you use Raspbian, then that name is ‘raspberrypi’ by default. It is really easy to change that name to (almost) whatever you like. This name is known as the ‘hostname’.
First, log onto your Raspberry Pi and open a terminal window. Your Raspberry Pi’s name is in a file called ‘hostname’ in the /etc directory. Edit that file as superuser with:
sudo nano /etc/hostname
This file contains only one line - the name of your Raspberry Pi. Change the name to whatever you like, but only use the letters ‘a’ to ‘z’ (upper or lower), digits ‘0’ to ‘9’, and the dash ‘-‘.
Save the file using Ctrl+x, then Y followed by Enter.
There is a second file that also contains the hostname, but it is only there as a workaround for some software. Therefore you should also edit that file:
sudo nano /etc/hosts
Find the line starting with 127.0.0.1, and change the name following it to your new hostname. Save the file using Ctrl+x, then Y followed by Enter.
Once you have rebooted your Raspberry Pi, all other computers on your network should see it with the new hostname. On the Raspberry Pi itself, you can check your hostname by issuing the following command in a terminal window:
Install a firewall
There are many firewall solutions available for Linux. Most use the underlying iptables project to provide packet filtering. This project sits over the Linux netfiltering system. iptables is installed by default on Raspbian, but is not set up. Setting it up can be a complicated task, and one project that provides a simpler interface than iptables is ufw, which stands for ‘Uncomplicated Fire Wall’. This is the default firewall tool in Ubuntu, and can be easily installed on your Raspberry Pi:
sudo apt install ufw
ufw is a fairly straightforward command line tool, although there are some GUIs available for it. This document will describe a few of the basic command line options. Note that ufw needs to be run with superuser privileges, so all commands are preceded with sudo. It is also possible to use the option --dry-run any ufw commands, which indicates the results of the command without actually making any changes.
To enable the firewall, which will also ensure it starts up on boot, use:
sudo ufw enable
To disable the firewall, and disable start up on boot, use:
sudo ufw disable
Allow a particular port to have access (we have used port 22 in our example):
sudo ufw allow 22
Denying access on a port is also very simple (again, we have used port 22 as an example):
sudo ufw deny 22
You can also specify which service you are allowing or denying on a port. In this example, we are denying tcp on port 22:
sudo ufw deny 22/tcp
You can specify the service even if you do not know which port it uses. This example allows the ssh service access through the firewall:
sudo ufw allow ssh
The status command lists all current settings for the firewall:
sudo ufw status
The rules can be quite complicated, allowing specific IP addresses to be blocked, specifying in which direction traffic is allowed, or limiting the number of attempts to connect, for example to help defeat a Denial of Service (DoS) attack. You can also specify the device rules are to be applied to (e.g. eth0, wlan0). Please refer to the ufw man page (man ufw) for full details, but here are some examples of more sophisticated commands.
Limit login attempts on ssh port using tcp: this denies connection if an IP address has attempted to connect six or more times in the last 30 seconds:
sudo ufw limit ssh/tcp
Deny access to port 30 from IP address 192.168.2.1
sudo ufw deny from 192.168.2.1 port 30
Additional customisations
Set-up the time zone
Add to .profile
# Set-up timezone France/Paris
export TZ='Europe/Paris'
Setting Locale Settings
The locale settings can be set (to en_US.UTF-8 in the example). Add to .profile
export LANGUAGE=en_US.UTF-8
export LANG=en_US.UTF-8
export LC_ALL=en_US.UTF-8
Generate the locale with the sudo raspi-config command.
Install mosh
Mosh is a replacement for your SSH session to your Raspberry Pi. Using Mosh you can work more reliable over cellular data. If the connection is lost Mosh will attempt to reconnect to your pi automatically, most of the time without you noticing.
Mosh requires SSH to be enabled so if you followed the previous steps you’re good to go.
Open a SSH session to your Pi and enter the following command
sudo apt install mosh
Your Raspberry Pi will now start installing Mosh. (It might be possible that it asks for a confirmation, just answer with y and Enter.) Wait now for the command-prompt to reappear.
You will have to allow mosh in ufw
sudo ufw allow 60000:61000/udp